Thursday, April 29, 2010

SQL Azure Architecture Overview

Continuing the theme of Windows Azure posts let's take a look the SQL Azure architecture.

Meat & Potatoes

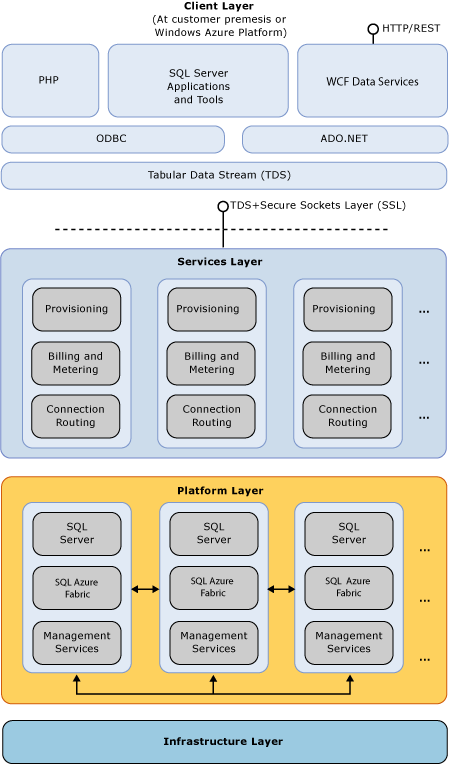
There's four layers that comprises SQL Azure:

  1. Client Layer
  2. Services Layer
  3. Platform Layer
  4. Infrastructure Layer
Client Layer

The client layer is closest to your application. This can be on the ground or in the cloud. Here you still have access to your favorite tools and libraries you use when building applications.

Services Layer

The services layer is the parkway to get from the client layer to the next layer, the platform layer. It serves these purposes: provisioning, billing/metering, and connection routing.

The services layer handles the provisioning of the database instances that you specify thru your Windows Azure account. Billing and metering is the money mechanism and determines what your usage and billing amount will be for the period. Connection routing is what keeps your application connected to everything as you scale, etc.

Platform Layer

The platform layer is the physical layer of the servers and services that support the aforementioned services layer. This is all managed thru the SQL Azure fabric. Think of the fabric as the components that make up your ground infrastructure (failover, load balancing, etc.).

Infrastructure Layer

The infrastructure layer is all the fun of administering the physical hardware and operating systems of the services layer.

Mongo Sez (Summary)

  1. Four layers of SQL Azure: Client, Services, Platform, and Infrastructure.
  2. Client: Closest to your application and your everyday tools and libraries.
  3. Services: Provisioning, Billing/Metering, and Connection Routing.
  4. Platform: Physical layer of servers and services managed thru SQL Azure fabric.
  5. Infrastructure: Administration of physical hardware and operating systems.
  6. Image source and detailed overview of SQL Azure architecture: MSDN Reference
  7. Also check the SQL Azure General Guidelines and Limitations on MSDN.

Wednesday, April 28, 2010

Configure Custom Domains in Windows Azure

So you've decided to call your web app up from the minors and into the big leagues to Windows Azure. Among other things with this move from the country to the big city you might be wondering, "How do I change the friendly DNS that Azure has graciously assigned my app to the even friendlier domain I already have?"

Meat & Potatoes


You've got your friendly, assigned DNS from Azure - friendlyappname.cloudapp.net ("friendlyappname" being replaced by your actual DNS name). At 50,000 feet, Azure assigns this DNS to your application as a layer of abstraction provided that the Virtual IP addresses (VIPs) of the application change and will prevent any disruption of service. Given this change, Azure is smart enough and will do the leg work of updating its DNS to properly map the new VIPs to the DNS it assigned your application.

Where does this leave you?

Putting It Together

Since there is the chance that the VIPs change you can't assign an A record to a specific IP for your domain. You'll have to settle with registering a CNAME. I won't cover what a CNAME is but in the event that this is Greek to you please collaborate with your infrastructure team and/or your domain's registrar to get these details.

Create CNAME Record


Still cruising at 50,000 feet, what you'll want to do first is create a CNAME mapping "www" subdomain to your Azure assigned name.

Forwarding the Root Domain


Now you'll want to use domain forwarding to map the root domain (myownfriendlierdomain.com) to the mapped subdomain (www.myownfriendlierdomain.com).

Things That Go FAIL


CNAME records need to map to a specific subdomain: they can't map to the root domain. "www" was used above, but maybe you're application is a forum, you could use "forum".

Secondly, do not wildcard map - "*.myownfriendlierdomain.com".

Summary

  1. It is possible to configure DNS to an application in the cloud.
  2. VIPs can change and the Azure assigned DNS name abstracts this to prevent any interruption in service.
  3. A record to specifc IP is not possible because of VIPs.
  4. CNAME is the answer.
  5. Create CNAME mapping - "www", "forum", "blog", et. al.
  6. Forward root domain to mapping - "www.myownfriendlierdomain.com", "blog.myownfriendlierdomain.com", et. al.
  7. Always map to subdomain, CNAME cannot map to root levels.
  8. No wildcard mappings.
Cheers!